Moving a Website to Netlify from GitHub Pages
The Need
I recently developed a new interest in how my blog and professional portfolio (this very website you are looking at) is performing. The goal was to see some basic numbers like total visitor numbers and a breakdown by pages, maybe referrers as well. Because I removed Google Analytics a while ago to protect the privacy of my visitors (and to not feed the giant with even more tracking data) and also do not think that any client-side tracking can be accurate for a small-traffic website like mine (because of blockers) I looked into server-side traffic analytics options.
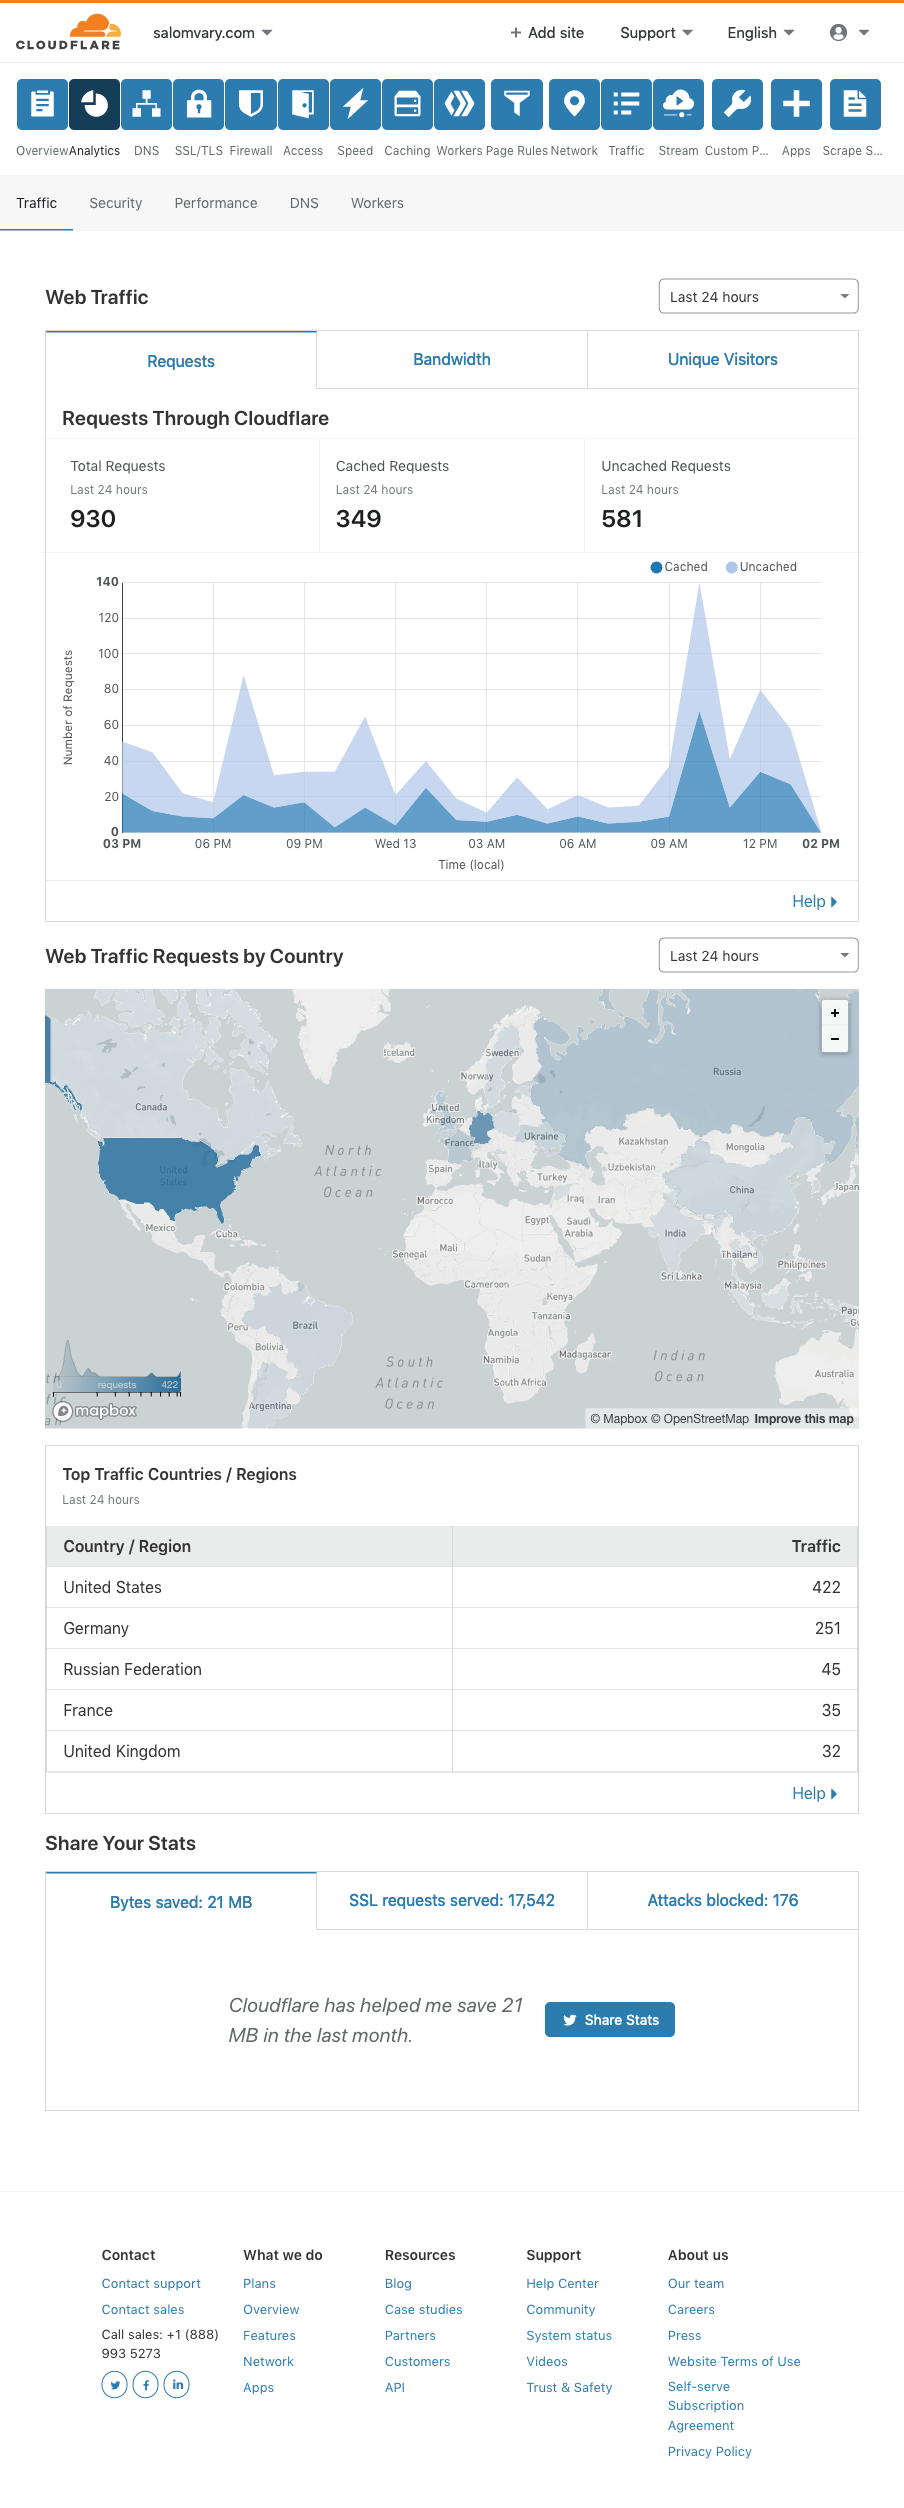
The website was hosted on GitHub Pages with a CloudFlare CDN in front of it. GitHub does not offer any sort of analytics, and even if it did, it would not be accurate as most of the requests are served by CloudFlare. CloudFlare does have analytics but it lacks page-level breakdown. I even talked to a CloudFlare sales representative and they confirmed that they only offer more traffic detail in the enterprise package, which costs several thousand dollars a month. Not my budget.
Enter Netlify
A quick ask-around resulted in several recommendations in the direction of Netlify. The service has been on my radar for a while but had no excuse to try it out until today. Netlify Analytics for $9/month/site looks like what I was searching for!
Step One: Add Site to Netlify
Because the source code for my website is in a GitHub repository and
uses Jekyll (the static website generator
behind GitHub pages) and this setup is supported by Netlify out of the
box, the first step was very easy. I signed up with my GitHub account
to Netlify and followed the wizard to deploy a website from a
repository. After allowing Netlify to access my repos and selecting
the one named salomvary.github.com I had the website up and running
under https://some-random-name-6a18c6.netlify.app within a few
minutes. Looks like we are done!
If you do not use your own custom domain, edit the site settings on
Netlify and change some-random-name-6a18c6 to something you like and
you can stop reading now.
Step Two: Set up Your Own Domain
If you are using your own domain on GitHub pages like me, the domain
needs to be migrated too. The Domain Management area on Netlify nicely
explains the options. Unless you want to switch to their own DNS
(which is a feasible option) you will have to edit the records at your
DNS provider, for which Netlify also offers guidance. In my case the
DNS provider is CloudFlare. All I had to do was changing the
salomvary.com CNAME record to point to
some-random-name-6a18c6.netlify.app. This is slightly different from
what Netlify recommended but CloudFlare does CNAME
flattening
which is kind of equivalent of adding an A record.
Almost immediately after changing the DNS records the website was
already served over HTTP by Netlify, and the automatic setup of the
free Let’s Encrypt HTTPS certificates did
not take more than 10 minutes. One can verify the successful
switch-over by looking for the server: Netlify HTTP response header
using the browser’s developer tools or the output of the curl -vL
http://mydomain.com command.
It is important to note that during these 10 minutes the website was not available due to browsers showing certificate errors this is expected and was acceptable in my case.
Step Three: Fixing GitHub Project Pages
This part only applies if you are switching from a GitHub user or
organization
site.
You can recognize this from the repo being named
myusername.github.io (or .com for old sites) or
myorgname.github.io. In this case a less known magic is in action
which just got broken by moving to Netlify.
The magic is the following. If you do not use your own domain on
GitHub Pages, your user/org site is at https://myusername.github.io
and your repo pages are at https://myusername.github.io/myproject.
However, if you do use your own domain with GitHub, all project pages
will be automagically served under https://mydomain.com/myproject
and the .github.io variants will redirect to your domain.
But since switching to Netlify https://mydomain.com/myproject no
longer serves the project page and neither does it redirect to
anywhere. Netlify simply serves a “404 not found” error page. Even
worse, https://myusername.github.io/myproject still redirects to
https://mydomain.com/myproject resulting in the same error. The only
exception are repos that are neither user nor organization page repos
and are configured to use their own custom domain. These will keep
working as before.
As long as you are fine with the project pages being served from
https://myusername.github.io/myproject with a redirect from
https://mydomain.com/myproject the fix is not very complicated:
Netlify allows configuring redirects using a file named
_redirects placed in
the root of the website repo. It should look like the example below,
where myusername is your GitHub username and myproject is the
GitHub repo name you want the redirect for:
/myproject/* https://myusername.github.io/myproject/:splat
/otherproject/* https://myusername.github.io/otherproject/:splat
When using Jekyll, do not forget to add this to _config.yml:
include:
  - _redirects
If you only have a handful of repos to redirect to, the redirects can
be created by hand. If you have many repos, are lazy, or like shaving
yaks,
you can automate creating _redirects. All you need is
jq and curl installed, plus
obtaining a GitHub personal access
token.
Run this command from a terminal window in the root of the website project:
curl -v -H 'Authorization: token  <your GitHub token>' \
  'https://api.github.com/user/repos?affiliation=owner&per_page=100&page=1' \
  | jq -r '.[]
    | select(.has_pages)
    | "/" + .name + "/* https://yourusername.github.io/" + .name + "/:splat"' \
  >> _redirects
Do not forget to change yourusername to your GitHub username! If you
have more than 100 repos on GitHub (check the Link response header
for the presence of rel=next) repeat this by changing page=1 to
page=2 and so on.
There is one more important thing before celebrating success: you need
to tell GitHub to no longer use your custom domain, otherwise
myusername.github.io/myproject will keep redirecting to
mydomain.com/myproject which we just configured to redirect to
myusername.github.io/myproject creating an infinite redirect loop.
This can be fixed by deleting the file named CNAME from the root of
the Git repo and pushing the changes to GitHub.
At this point, your website should be serving visitors as it was before.
Step Four: Cleaning Up SEO
There is one remaining problem which might or might not bother you. With this setup, the website content can be available under four different URLs:
- The source
at
https://github.com/username/username.github.com/blob/master/_posts/post.markdown - The GitHub Pages site at
https://username.github.io - The Netlify
website at
https://some-random-name-6a18c6.netlify.app - And
https://yourdomain.com
This is OK, as long as you do not care about search engine optimization (SEO), but Googlebot and other crawlers will treat these as duplicate content with appropriate punishments.
Hiding the website source in the GitHub repo is allegedly only possible by not using the master branch unless the repo is made private, which - now with free private GitHub repos - is also an option. This is a solution for #1.
If the repo is not a user or organization repo, GitHub allows turning Pages off from the repo settings page. This can solve #2.
For a user or organization page, there is no option to turn Pages off
(which kind of makes sense). Setting the repo to private also does
not disable the public
website.
The only solution is renaming the repo from username.github.io to
mydomain.com or whatever you like (from now on, the name does not
matter as we do not rely on GitHub Pages’ magic).
Disabling the Netlify “default subdomain” (my-thing.netlify.app)
does not seem to be possible, which means web crawlers might also
discover it, resulting in duplicate content. Unless there is some
robots.txt trickery I am not aware of, or domain-specific redirect
rules on Netlify are possible (to be figured out) the only solution is
adding canonical
URLs to
all pages of your website. This, with the help of the Jekyll SEO Tag
plugin is not very
complicated (and is a good idea anyway). Problem #3 solved.
Conclusion
As we saw the trivial task of moving a static website from one hosting provider can turn into a deep rabbit hole. The good thing is, it did not take as much time as it may seem. In fact writing this blog post has taken much more time than the website migration itself. The other good thing: I did not even have to pay for Netlify, because it’s free, including custom domains.
Well, actually, I did end up paying for Netlify. If you still remember, the original motivation was to gather page-level analytics on the website traffic, so I pulled my credit card and forked out $9 for Netlify Analytics.
Which, to my slight disappointment, is only a tiny bit better than analytics at CloudFlare, offering nothing more than the top x (5?) most visited URLs in the pages section:

(For the curious here is a screenshot of the entire Netlify Analytics page few hours after turning it on.)
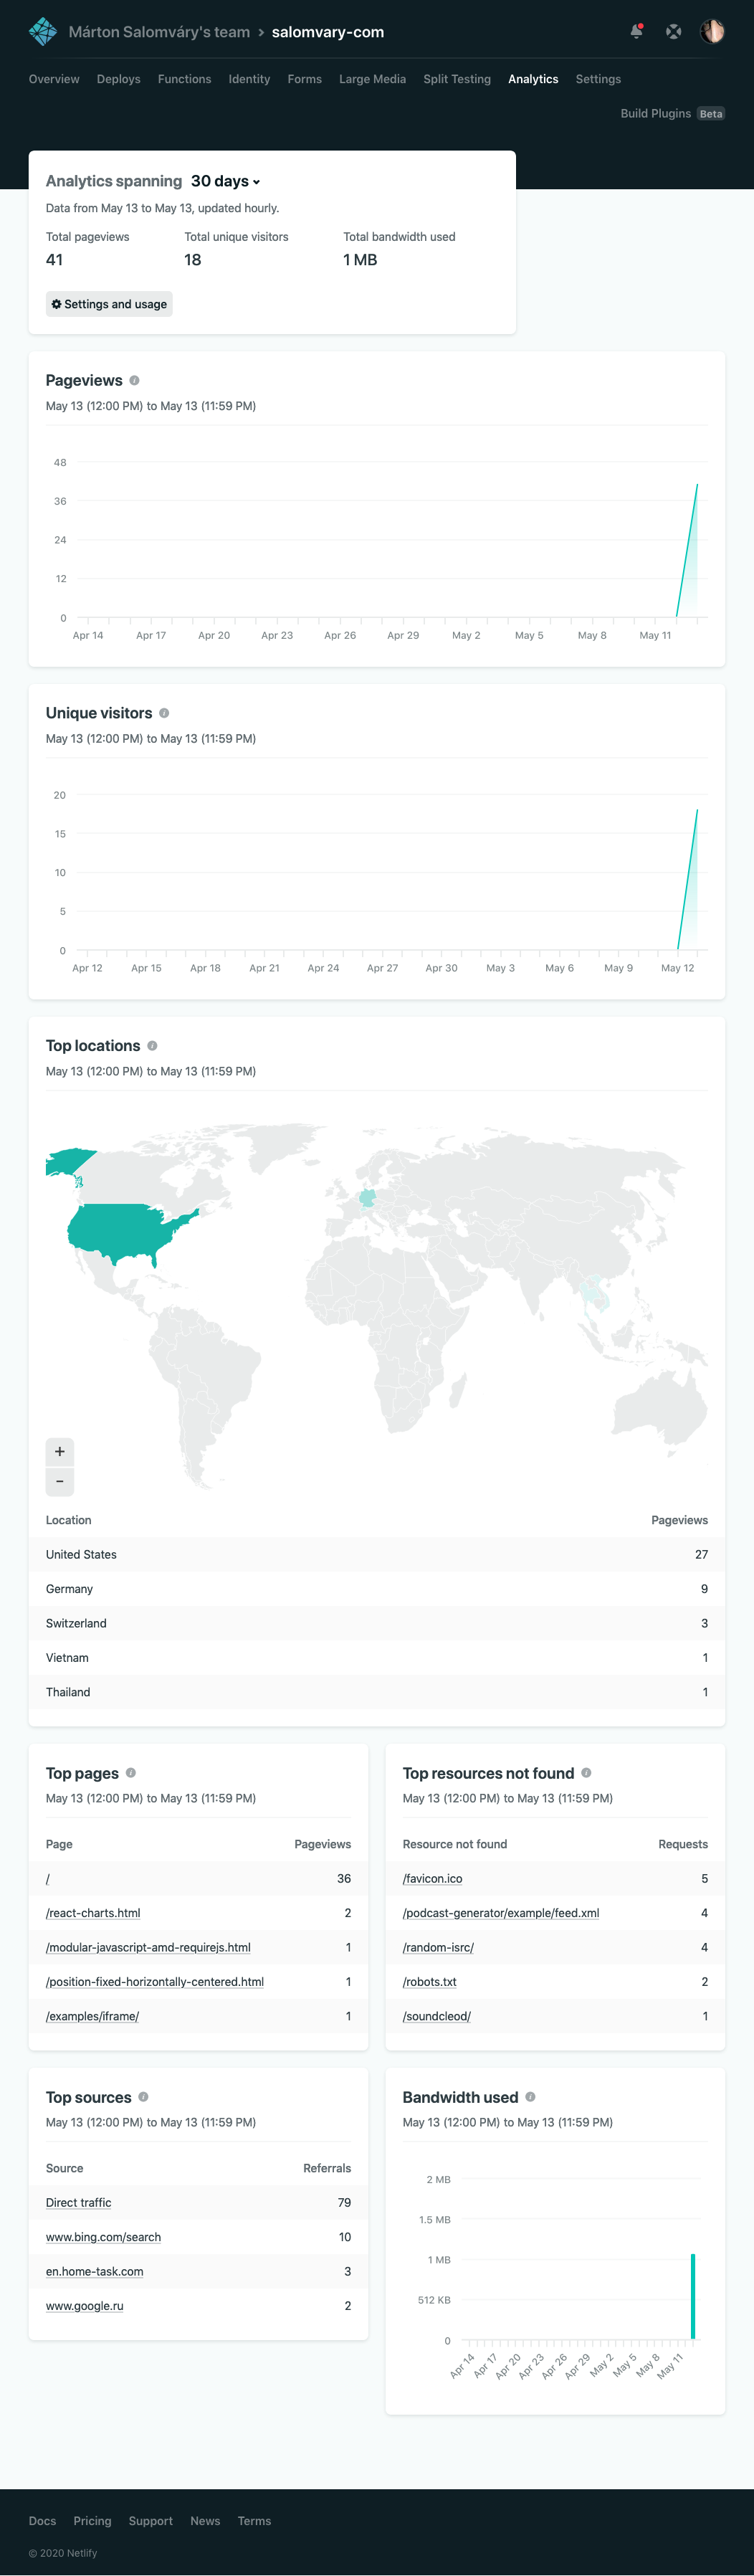
It was an interesting rabbit hole anyway :)